The actual restoration actually began back in 1975 when I first took the car off of the street to fix a few things correctly. I began to disassemble the car slowly, piece by piece, until I had enough parts to begin working with.
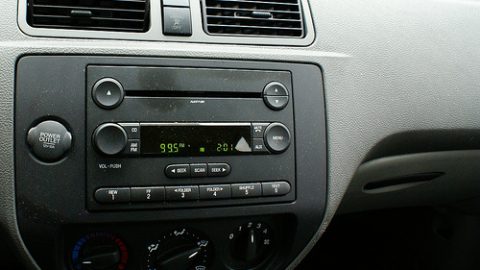
I sent out some of the parts that needed to be re-chromed like the taillight bezels, bumpers door handles etc. I sent the starter, windshield wiper motor and alternator out to be Show Restored. I removed and sent out the radio to Suburban Auto Radio in Oaklyn, NJ because it had a lot of hissing and buzzing in the background while the music was playing. It was a shame that I didn’t know how long the car would sit until it finally got back onto the road, because I had to send it out again in 1999 to have it fixed again.
Apparently, the capacitors used were a paper-wound type that would disintegrate after about ten years from exposure to the air. After toying with the car for about a year I got bored with it because I ran out of money and there wasn’t much left to do for free. I covered it with a tarp and it sat there waiting….
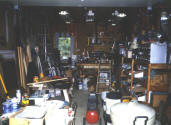
Pre-Restoration Fotos
Corvette Restoration
Continuing on, we moved to another town and I hooked up the tow-bar that I had custom made for the Chevrolet Corvette, and off we went to the next garage.
I made sure that I kept all of the boxed up parts together for future use, or so I thought! I never even touched it and woops, it was time to move again. Once again I gathered up all of the boxed parts, hooked up the tow-bar, and pulled the Corvette to it’s final destination.
A few years passed before I ever took off the tarp. The car had turned into a storage shelf for light boxes and soft items.
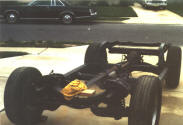
 I dusted off the body and began taking the rest of the car apart to finish it. Once the interior was ripped out and all of the chrome ornaments were removed from the body, I proceeded to hoist the body off of the frame and hang it from the ceiling of my garage for about two years. I pulled the motor, transmission, rear unit, gas tank, brake lines and brakes so that I could clean and refinish the frame. I disassembled the motor for inspection and then sent the block, heads and crank out for machine work.
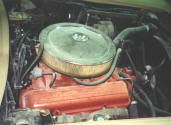
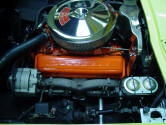
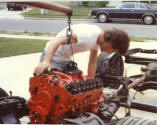 When the machine work was completed on the motor I brought it home and prepared to build the motor. The block had been baked, magna-fluxed for cracks and bored to .020 over to true-up the cylinders. The heads were baked, decked .010 to straighten them, and finished with PC seals, screw-in studs, and hardened seats installed. After I rebuilt the short-block, I installed the heads, manifold, bell-housing and transmission into the awaiting finished frame.
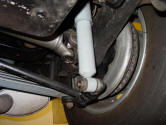
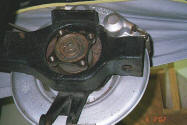 Once the motor & transmission were installed, I began working on the brake and suspension systems. The front end bushings, ball joints etc had already been replaced prior to the body-off period so I only had to concentrate on the rear suspension and the brake system. I rebuilt the rear leaf spring with a liner kit from Long island Corvette Supply and it turned out looking really nice. Both of the trailing arms had been rebuilt with new bearings and seals but that was back in 1976 so they looked a little weathered. Rusty actually!
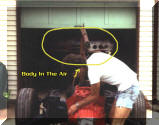
 Now that the drivetrain was completed I took a short rest, about a year! I got the bug again and pulled off the tarp from the rolling frame, sweet! It looked just like I left it a year ago. I lowered the body back down from the rafters of my garage and bolted it back together. It’s looking like a car again except it was only a short experience. The kids were getting older and playing sports was important so under the tarp she went for another long nap. Through the years I would peek at her once in a while just to make sure that she was still there. My Son graduated high school and went to college and then my Daughter graduated high school and also went to college. Finally I could see a light at the end of the tunnel, and it wasn’t a speeding locomotive! I pulled off the tarp and began to document what I had accomplished already and what still needed to be done.
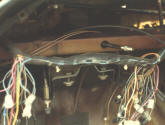
The first thing was that I made a list of all parts that I had in boxes and bags. I then made a list of what I needed to put the car back together and compared them side by side. Wow, what a difference! For some unknown reason I needed more parts to complete it then I already had on hand. Looks like I had to make a stop at the bank for some cash. I also had to prep the car to send it out for a paint shop. The body was already stripped of paint down to the jel coat and there were no ornaments or chrome to remove so it was ready to go. There were no taillights either so the car had to be flat-bedded to the paint shop. I spoke with my friend at Tru-Line Auto Body and he made arrangements for the flat-bed for me.
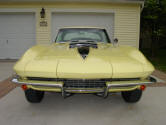
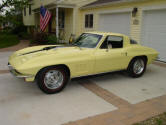
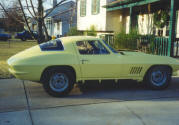
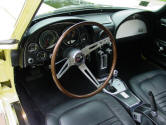
The Finished Product


Author: Todd Roman